
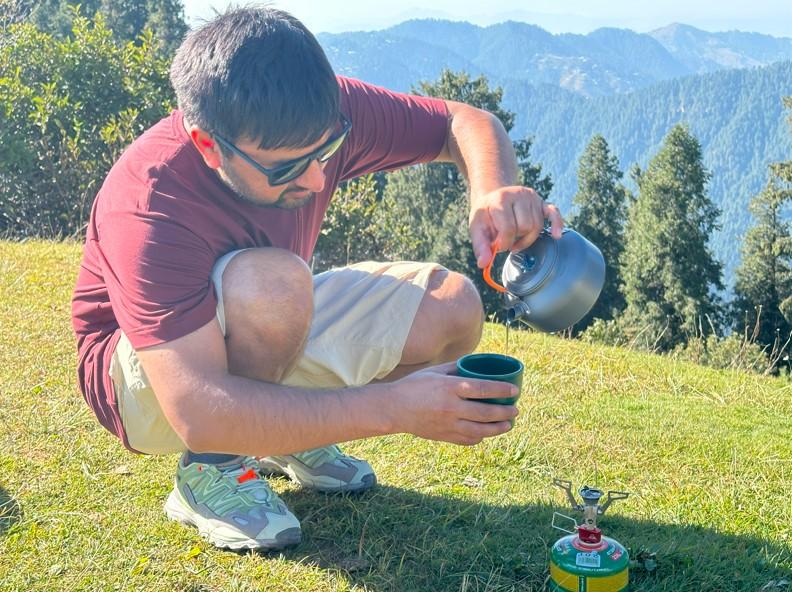
When you’ve spent all day on your feet, there’s nothing quite like a hot meal to reset the body and lift the spirits. A good stove isn’t just about boiling water fast — it’s about reliability when you need it. That’s why finding the best backpacking stove for your needs is about more than just weight and boil time; it’s about matching performance to real-world conditions.
Whether you’re after quick-and-easy freeze-dried meals or prefer to flex your backcountry cooking skills, the right stove makes a difference.
Over the years, I’ve used just about every kind of stove — from compact canister models to multi-fuel setups built for expedition use. This article draws on those experiences to walk you through the main types of backpacking stoves, their strengths and limitations, and which ones I’d recommend based on real-world use.
Best Overall Backpacking Stove
1. MSR PocketRocket 2
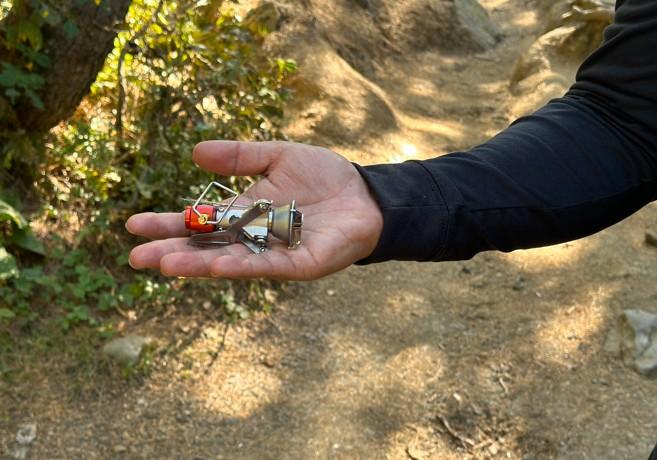
The MSR PocketRocket 2 has been a solid performer in my kit for several years now, especially when I’m aiming to keep things light and simple. Weighing just 2.6 ounces, this ultralight backpacking stove barely tips the scales and easily folds down to fit inside a small cook pot, making it a great option for solo hikers and ultralight backpackers.
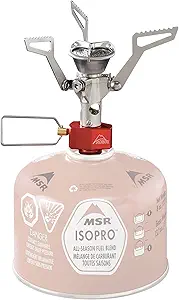
Where it really shines is in its simplicity. There are no piezo igniters or complex mechanisms — just unfold the arms, screw it onto your gas canister, and strike a flame.
Boil time sits at around 4.5 minutes per liter, which is perfectly adequate for morning coffee or rehydrating meals at the end of the day. It’s a fast, no-fuss stove that does exactly what it says on the tin.
That said, it’s not without limitations. The stove performs best in calm or sheltered conditions — any significant breeze will noticeably slow boil times and increase fuel use. I always recommend using a decent windscreen or cooking behind a natural barrier when possible.
Over the years, I’ve found the PocketRocket 2 to be an ideal stove for shorter solo trips or for those chasing grams. It’s not my go-to in alpine or windy conditions, but for most fair-weather hikes, it’s hard to beat for size, weight, and reliability.
Pros:
• Lightweight and compact.
• Affordable.
• Easy to use.
Cons:
• Limited simmer control.
• Wind performance could be better.
Read More: MSR PocketRocket 2 Review
Stove with Excellent Wind Performance
2. SOTO WindMaster Stove
The SOTO WindMaster has been a solid performer in my gear rotation, especially when I know I’ll be cooking in less-than-ideal conditions. It’s a touch heavier than some ultralight models at around 2.3 ounces with the 4Flex pot support, but that extra weight comes with serious benefits in real-world use.

Where this stove really sets itself apart is in wind performance. Unlike many upright canister stoves, the WindMaster lives up to its name — it handles breezy conditions with ease, maintaining a steady flame and reliable boil time of around four minutes per liter. I’ve used it in exposed alpine camps and on windy ridgelines, and it’s always delivered.
The pot stand is detachable and a bit bulkier compared to minimalist setups like the MSR PocketRocket 2, but in return, you get a far more stable cooking platform — ideal for larger pots or group cooking. Add in excellent simmer control, and this stove becomes a real asset for those who like to cook more than just dehydrated meals on the trail.
While the pot support arms add some bulk and take a little getting used to in terms of setup, the trade-off is worth it for hikers who cook in variable conditions. If you’re a three-season backpacker or someone who enjoys a bit of trail gourmet, the WindMaster is arguably one of the best all-around stoves available.
Pros:
• Superior wind resistance.
• Precise simmer control.
• Fuel-efficient.
Cons:
• Slightly heavier than some ultralight options.
• Support arms add bulk.
Best Integrated Backpacking Stove System
3. Jetboil Flash Stove System
The Jetboil Flash is a stove I’ve reached for time and time again when hot food fast is the priority. At 13.1 oz with the cup and burner included, it’s no featherweight, but that’s not the point of this integrated system.
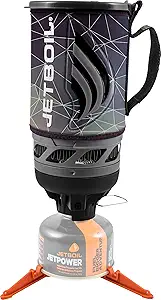
What the Flash does best is boil water—fast. In real-world use, I consistently get boil times around three and a half minutes per liter, even in chilly, early-morning starts. The cup snaps securely into the burner, and with the push-button ignition and insulating cozy, the whole setup feels streamlined and efficient.
That said, it’s not a system designed for simmering or delicate cooking. The flame is strong but not particularly adjustable, so meals are generally limited to boiling water for dehydrated food, drinks, or simple soups. It’s also a bit on the bulky side for those looking to travel ultralight, and the size may feel excessive for solo hikers.
But for group trips, cold-weather hikes, or anyone who wants speed and convenience at camp, the Flash delivers. It’s also surprisingly wind-resistant, making it reliable in less sheltered cooking spots.
While not for the ounce-counters, the Jetboil Flash is a favorite for group cooking, cold-weather treks, and anyone prioritizing convenience. If you value speed and simplicity over culinary creativity, it’s one of the most reliable and user-friendly options on the market.
Pros:
• Rapid boil time.
• Integrated system reduces setup time.
• Wind-resistant design.
Cons:
• Heavier and bulkier.
• Limited simmer control.
Best Backpacking Stoves: Stove Comparison Table
A side-by-side comparison table of the main stoves discussed:
| Feature | MSR PocketRocket 2 | SOTO WindMaster | Jetboil Flash |
| Weight | 2.6 oz | 2.3 oz (w/ 4Flex) | 13.1 oz |
| Boil Time | ~4.5 min/liter | ~4.0 min/liter | ~3.5 min/liter |
| Wind Resistance | Low | High | High |
| Simmer Control | Limited | Excellent | Poor |
| Integrated System | No | No | Yes |
| Best Use Case | Ultralight solo hikes | Windy or cold trips | Group/cold trips |
How to Choose the Best Backpacking Stove: Field-Tested Tips and Personal Insights
Weight & Packability
One of the most important factors when choosing a backpacking stove is how much it weighs and how easily it fits into your cook kit.
If you’re aiming to trim ounces and keep your setup minimal, a small upright canister stove like the MSR PocketRocket 2 (2.6 oz) is a strong contender. It packs down tiny—small enough to fit inside most pots—and is ideal for fast-and-light adventures.
On the far end of the spectrum are integrated systems like the Jetboil Flash. At just over 13 oz, they’re certainly bulkier, but the trade-off is speed and convenience, especially in cold or windy conditions.
Then there are the minimalist alcohol stoves, often weighing under an ounce. They’re about as light as it gets, but they require more care in fuel management and aren’t as efficient in bad weather.
Liquid fuel stoves, like the MSR WhisperLite, are reliable workhorses for cold-weather trips or international travel — but they do come with extra weight and bulk from the fuel bottle, pump, and more durable construction. A foldable stove, like MSR PocketRocket 2, saves valuable pack space while delivering reliable cooking power on the trail
In short: your pack weight and space limitations will quickly guide your stove decision. There’s no one-size-fits-all, but experience will teach you what balance works for your style. The lightest backpacking stove cuts weight without sacrificing performance, perfect for ultralight setups.
Boil Time & Efficiency
Over the years, I’ve found that boil time isn’t just about speed — it’s also about morale. Nothing lifts your spirits on a cold morning like a steaming cup of tea in under four minutes.
That’s where integrated systems like the Jetboil Flash shine, often bringing a liter of water to boil in around 3.5 minutes. They’re built for speed and efficiency, especially in windy or cold conditions.
Standard canister stoves like the MSR PocketRocket 2 usually take a bit longer — about 4.5 minutes per liter under ideal conditions — but they’re lighter and more versatile when it comes to pot choice. Alcohol stoves, while popular in the ultralight community, require a bit more patience.
It’s not uncommon to wait 7 minutes or more, and they don’t perform well in wind unless paired with a decent windscreen.
Keep in mind, efficiency isn’t just about speed. In tougher conditions — strong wind, cold temperatures, or high altitude — even the most efficient stoves can struggle. Using a windscreen, choosing a sheltered cooking spot, and knowing your stove’s quirks can make a big difference out there.
Wind Performance
Wind is the silent fuel killer on the trail. If you’ve ever tried to boil water on an exposed ridgeline or during a gusty alpine morning, you’ll know just how much wind can affect stove performance. Some stoves cope better than others.
Integrated systems, like those from Jetboil, tend to excel here. Their enclosed design and built-in wind protection mean they keep performing even when the breeze picks up. You’ll notice much less heat loss, and that means quicker boil times and better fuel efficiency.
Standard canister stoves, on the other hand, are a bit more exposed. I’ve watched flames flicker and sputter on my MSR PocketRocket 2 while camped above the treeline.
A lightweight windscreen can help, but you’ve got to be careful. Using a windscreen with a canister stove traps heat around the fuel canister, and if you’re not cautious, it can overheat. That’s a safety risk.
My advice? Pick your cooking spot wisely — look for natural windbreaks like boulders or tree stumps — and always understand the limitations of your gear.
Simmer Control
For some hikers, boiling water is all they need. But if you enjoy cooking more than just freeze-dried meals — say, a risotto or a slow-cooked lentil curry — then simmer control becomes a real priority.
Precision-valve canister stoves, like the SOTO WindMaster, lead the pack here. The WindMaster’s micro-regulator valve offers exceptional flame control, allowing for low, steady heat that won’t scorch your food. It’s best for real cooking in the backcountry.
Integrated systems, while excellent for speed, often fall short here. In my experience, the Jetboil Flash tends to boil or nothing. That’s fine if you’re just heating water for tea or noodles, but not great for anything delicate or slow-cooked.
As for alcohol stoves, they’re charmingly simple but offer little in the way of flame control. You’ll mostly get one heat setting: full blast. That works for boiling, but for actual cooking, it’s limiting.
If you value variety in your trail meals, simmer control is something you don’t want to overlook.
System vs. Standalone
Choosing between an integrated stove system and a standalone stove comes down to your cooking style and priorities on the trail.
Integrated systems, like the Jetboil Flash, combine the burner, pot, and heat exchanger into a tidy, efficient package. I’ve found them excellent for quick meals — perfect when you’re cold, tired, and just want a cuppa or a rehydrated dinner fast.
But that convenience comes with trade-offs. They’re heavier, bulkier, and not particularly flexible if you like to cook anything beyond boiling water.
Standalone stoves, on the other hand — like the MSR PocketRocket 2 or the SOTO WindMaster — give you more freedom. They’re lighter, compact, and work with whatever pot you bring. I’ve used them for everything from frying up bannock to simmering stew, which just isn’t feasible on an integrated setup.
If you’re mostly boiling water, integrated stoves make sense. But if you like a bit more variety in your camp kitchen, a standalone stove paired with your pot of choice is hard to beat.
In short:
• Go integrated if you prioritize simplicity, speed, and efficiency.
• Stick with standalone if versatility and weight savings matter more — or if your trail meals go beyond freeze-dried fare.
- Integrated Systems:
• Pros: Fast boil times, fuel efficiency, all-in-one design.
• Cons: Heavier, less versatile for cooking. - Standalone Stoves:
• Pros: Lightweight, versatile, compatible with various cookware.
• Cons: Require separate pots and accessories.
Cold Weather Performance
When temperatures dip below freezing, not all stoves hold up equally. I’ve been caught out on alpine trips where my trusty canister stove, which had served me well on summer walks, faltered as the mercury plummeted.
In cold-weather testing, I’ve found significant differences between canister stoves and liquid fuel stoves. It’s a good reminder that your stove’s performance can change drastically in cold weather.
Canister stoves are compact and convenient, but they’re vulnerable to pressure drops in the cold. The colder it gets, the less efficient they become — sometimes refusing to work altogether once the gas inside depressurizes.
Liquid fuel stoves, such as those that burn white gas, are the go-to for serious winter trips. They’re bulkier and heavier, and they do require some upkeep, but they keep chugging along in sub-zero conditions when canisters give up.
Some higher-end canister models, like the SOTO WindMaster, include pressure regulators designed to maintain steady performance in colder temps. I’ve found these to be a good compromise for shoulder seasons and frosty alpine mornings.
If you regularly hike in the cold, choose your stove with care — because nothing’s worse than struggling to boil water when you can’t feel your fingers.
Ease of Use & Stability
On a cold, wet evening with fading light, the last thing you want is to fiddle with gear. Ease of use might sound like a luxury, but out on the trail, it quickly becomes a necessity.
Canister stoves are the simplest to operate. Just screw it onto the canister, turn the valve, and light it up. No fuss. They’re ideal for beginners or anyone who wants to get dinner sorted without the drama.
Liquid fuel stoves, while reliable, require a bit more patience. You need to prime them first — something that’s easy enough with practice but not always intuitive in wind or rain. They also need more regular maintenance, like cleaning the fuel lines, especially if you’re using them over extended trips.
Integrated systems like the Jetboil Flash strike a nice balance: quick to set up, with everything fitting neatly into one package. But the more integrated a system is, the more there is to go wrong, especially if you’re rough on gear.
And don’t forget about stability. I’ve had pots tip over on narrow burners when cooking on uneven ground. Look for a stove with a wide base or add a canister stand if you’re prone to cooking on rocky terrain.
Ignition Method
There’s a simple rule I’ve learned over the years — if your stove won’t light, it doesn’t matter how fast it can boil water. Ignition might seem like a minor feature, but out in the wild, it can make or break your meal.
Some stoves, especially integrated systems like the Jetboil, come with a piezo igniter. It’s a handy push-button spark that makes lighting quick and easy, especially in the cold.
But here’s the rub — these things have a reputation for giving up the ghost after a while. I’ve seen more than a few fail halfway through a trip.
Then there’s manual ignition. It’s old-school, dependable, and adds virtually no weight. You’ll need to pack a lighter or waterproof matches, but you’ll also know exactly what you’re working with. No surprises.
My advice? Always carry a backup — even if your stove has a piezo. A mini Bic or a fire steel weighs next to nothing and could save dinner when you need it most.
Fuel Availability & Resupply
Here’s one of those practical things you don’t always think about until you’re already out there — can you even find fuel for your stove where you’re going?
Canister fuel is probably the most popular these days — clean-burning, simple, and efficient. In most developed countries, especially near popular trails, you’ll find canisters in gear shops, general stores, and even some petrol stations. But in more remote areas, or overseas in places without a big hiking scene, they can be next to impossible to track down.
Liquid fuel, like white gas, has long been a favorite for long-distance travelers. It’s easy to find globally, works in freezing temperatures, and you can refill from larger containers, which cuts down on waste. The downside? It’s bulkier, heavier, and requires a bit more maintenance.
Then there’s alcohol fuel, the ultralight cult favorite. It’s dirt cheap, burns quietly, and is available in unlikely places — hardware stores, service stations, even pharmacies. I’ve used methylated spirits in tiny outback towns when nothing else was on offer.
Bottom line: match your fuel type to your route. A short local hike? Canisters are fine. International travel or remote tracks? Think liquid fuel or alcohol. Resupply options can make or break your cooking setup.
Maintenance & Durability
Your stove doesn’t just need to work straight out of the box — it needs to keep working, week after week, trip after trip. And not every type is built the same when it comes to longevity and upkeep.
Liquid fuel stoves — the old-school workhorses — do need more regular care. You’ll need to clean the jets, keep fuel lines clear, and sometimes replace worn parts. But the trade-off? These stoves are incredibly durable and can last for years with basic maintenance.
Canister stoves are popular for a reason — they’re basically plug-and-play, with no priming or cleaning required. But they can be a bit more fragile over time, especially the ultralight models with fine threads or delicate valves.
Alcohol stoves win on simplicity. Fewer parts mean fewer things to break. As long as you don’t step on it or crush it in your pack, you’ll get years of use out of a basic titanium burner.
So what’s right for you? Ask yourself how much time and patience you’ve got for stove care. If you’re handy and heading into the backcountry for extended trips, a liquid fuel stove may be worth the upkeep. If you’re looking for simple, hassle-free performance, canister or alcohol is the way to go.
Price & Value
Backpacking stoves can cost anywhere from $10 to over $150 — and while it’s tempting to chase the cheapest option or the fanciest tech, the best value depends on how and how often you hike.
- Budget Stoves (Under $20) work — but expect slower boil times, less stability, and limited durability. They’re great for beginners or as a backup, but may not hold up over extended use or harsh conditions.
- Mid-Range Stoves ($50–$60) are the sweet spot for most hikers. Stoves like the MSR PocketRocket 2 or SOTO Amicus offer solid reliability, quick boil times, and compact designs without breaking the bank. If you’re heading out regularly but not planning an Arctic expedition, this range hits the best balance of performance and cost.
- High-End Stoves ($100+) like the Jetboil Flash or MSR Reactor offer rapid boil times, integrated cookware, and excellent efficiency — ideal for serious trekkers or cold-weather hikers.
Think about how often you’re cooking, what conditions you’ll face, and whether you value speed, versatility, or simplicity. A $20 stove might be all you need — or a $140 system might be worth every cent if it means hot food when you need it most.
Types of Backpacking Stoves Explained
• Canister Stoves
- Screw-on style; lightweight and easy to use.
- Widely compatible and fast boiling.
- May struggle in cold or wind unless regulated.
• Integrated Stove Systems
- All-in-one designs that include pot + burner.
- Prioritize efficiency and fast boiling over versatility.
- Heavier and bulkier, but ideal for snow melting or coffee on cold mornings.
• Liquid Fuel Stoves
- Reliable in cold and high-altitude conditions.
- Use white gas or multi-fuel options.
- Require maintenance, heavier, better for international travel.
• Alcohol Stoves
- Ultralight, DIY-friendly, simple design.
- Slower boil times, no simmer control.
- Great for minimalists and thru-hikers with low fuel needs.
• Solid Fuel Stoves
- Use Esbit tablets; super compact and low weight.
- Low heat output, slow to boil, leaves residue.
- Useful as a backup or emergency option.
Backpacking Stove Use & Safety Tips
Setup Tips
- Choose level, sheltered ground.
- Use a windscreen when appropriate.
- Nest pots and fuel to save space.
Cooking Tips
- Always carry a lid to improve efficiency.
- Stir often and watch for scorch points.
- Simmer carefully to avoid boilovers.
Safety Considerations
- Never use a stove inside a tent.
- Ventilate well when cooking in shelters.
- Let the stove cool before packing; avoid burns.
Fuel Management
- Estimate fuel based on meals/boil times.
- Always bring extra for emergencies.
- Label partial canisters and track usage for long trips.
Final Thoughts: Which Stove Should You Choose?
There’s no one-size-fits-all answer when it comes to picking the best backpacking stove. What works for a solo overnighter in fair weather may fall short on a multi-day trek through cold or windy conditions. The key is to match your stove to the kind of hiking you actually do.
If you’re focused on keeping things simple and light, a small canister stove like the MSR PocketRocket 2 is hard to beat. If you need more performance in the cold or want faster boil times, an integrated system might be worth the weight. And if you’re heading somewhere remote or international, a liquid fuel stove offers peace of mind when resupply is uncertain.
Whatever you choose, make sure you know how it works, test it before you head out, and bring a backup way to light it.
Read More: